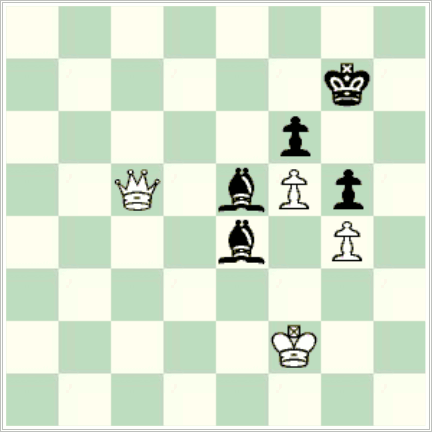
Note: this post has nothing to do with Irish chess, and is thus off-topic for this blog. But I keep seeing references to the ending below, and there doesn’t seem to be any other convenient forum for my comments on it, so here it is.
Polugaevsky, in Grandmaster Performance (Cadogan, 1994), describes his adjournment analysis of his game against Geller from Skopje 1968 (pp. 120-27) as ‘possibly the most meticulous analysis I have ever made in my life’ (p. 127). As a basis for the analysis, he first constructed two ‘fortress’ positions that, he asserted, lead to no win. The diagrammed position here is the first.

Based on Polugaevsky – Geller, Skopje 1968
‘The e4 bishop simply strolls up and down the long white-squared diagonal, and even the united efforts of king and queen are insufficient to trap it or drive it off’ (p. 123).
This is a famous piece of analysis, and it constantly comes up in various contexts: the most recent I noticed was this week in Grischuk and Svidler’s commentary on the first Carlsen – Caruana game on Chess24.com. It is also discussed by Kasparov in My Famous Predecessors 3 (Everyman, 2004), pp. 82-85.
What I haven’t seen mentioned anywhere is that Polugaevsky was wrong. There is no fortress in the diagrammed position, and White can win, no matter whose turn it is to move.
The harder case is with White to move. White wins via 1. Ke3 Bg2 (1… Bh1? loses the bishop immediately: White checks successively on e7, e8, g6 and h6; 1… Bb1? 2. Qd5 wins quickly) 2. Qa7+ Kf8 (2… Kg8?? 3. Qa2+; 2… Kh8 3. Qf7 Bc6 (only move*) 4. Qf8+ Kh7 5. Qc5 Bg2 6. Kf2 Be4 7. Qc4 and the light-squared bishop drops) 3. Kf2 Be4 (3… Bh1 comes to the same thing: 4. Kg1 Be4 (4… Bf3?? 5. Qa3+) 5. Qe3) 4. Qe3 Bh1 5. Kg1 Bb7 6. Qc5+ Kg8 7. Qb5, and wins, since the bishop will be forked next move.
[Added February 20, 2019: * Only move along the long diagonal that does not immediately lose the bishop. For completeness, there’s also 3… Bf1, when White wins via 4. Kf2 Ba6 (4… Bb5 transposes) 5. Qe6 Bb5 6. Qd5.]
The underlying logic is that White must at all costs prevent the light-squared bishop from reaching f7, when there is indeed an unbreakable fortress. From the diagrammed position, the main line sees White quickly forcing the Black king to f8: this is important as it means the bishop can’t move to d5, and for good measure c6 is off limits as well. Since h1 is also usually unavailable due to a fork on the h-file, Black is shorter of available squares than is apparent at a first look, and there is no fortress.
With Black to play from the diagram, it’s all somewhat simpler, since Black is nearly in zugzwang. After 1… Kh8 (only move) 2. Qf7 Bc6 3. Qf8+ Kh7 4. Qc8 Be4 5. Qc4, the bishop is lost and White wins.
Black’s main problem in the diagram is the awkward and unstable position of the light-squared bishop on the long diagonal. But that’s not the full story: Black’s king is also in the wrong place, ruling out h1 as a haven for the bishop in many cases. Put the Black king on d7 instead, and Black has a genuine fortress.

Here’s the solution again, but tracking the squares on the long diagonal available to the light-squared bishop after each move: 1. Ke3 Bg2 (g2) 2. Qa7+ Kf8 3. Kf2 Be4 (e4, h1) 4. Qe3 Bh1 (b7, h1) 5. Kg1 Bb7 (b7) 6. Qc5+ Kg8 7. Qb5 (none: the queen covers three squares directly, three more via immediate forks (a8, e4, f3), and the king covers two).
In the final position the White king could be at f1, since h1 is unavailable via the queen check at e8, etc.