
The recent post about the DCU Majors 2024 gave the Bartczak – Spence game as the most interesting, with plenty of play left in the final position. I thought Black “should be able to draw”, but the line I offered also left plenty of play. Delving deeper turned up some interesting points.
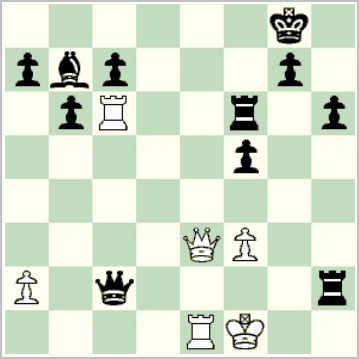
Final position; White to play
From the final position, I think best play goes 31. Rxc2 Ba6+! 32. Ree2! Rxe2 33. Rxe2 c5! (slightly more accurate than 33… Bxe2+ 34. Qxe2 c5 as I gave before, since then Black has to work out the consequences of 35. Qa6) 34. Kf2 Bxe2 35. Qxe2 a5 36. Qe8+ Kh7, reaching the second diagrammed position.
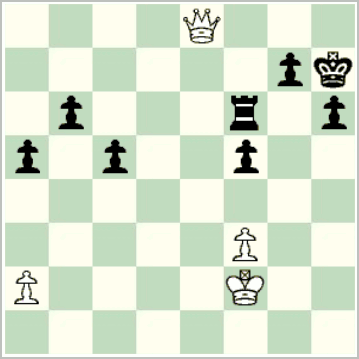
Analysis
An obvious idea for Black is to sit tight, maintaining the rook on the 6th rank, when it looks as if he has a fortress. But in fact it is not as easy as that.
White can play his king to e5, capture the f-pawn after … Rg6, and continue f4-f5, reaching the third diagrammed position. Black has run out of squares on the 6th rank, so what now?
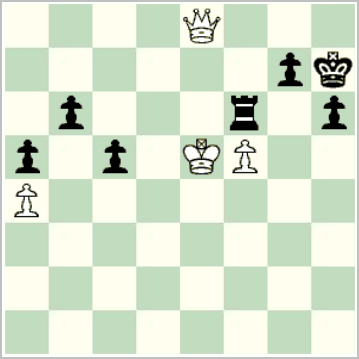
Analysis, II
White to play
Black still draws via 1… h5! 2. Qxh5+ Kg8, when White cannot break through.
This seemed to me at first as a simple fortress, in which the queenside pawns played essentially no role. What I had missed is that this is not true: remove the queenside pawns in the third diagram (getting the fourth diagram), and White wins!
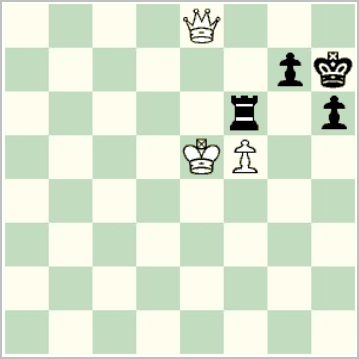
Black to play
After 1… Rb6, 2. Qe6! wins quickly. Here 1… h5 does not help. After the h-pawn disappears, Black cannot hold a fortress based on Rf6-h6, because White can simply capture on f6 at a suitable moment, reaching a winning pawn ending, e.g., 2. Qxh5+ Kg8 3. Qe8+ Kh7 4. Qe6! Rh6 5. Kd5! Rf6 (5… Kh8 6. Qxh6+!) 6. Qxf6+! and wins.
This resulting pawn ending is winning only because Black will fall into zugzwang. Adding the queenside pawns back in, and specifically the pawn on c5, this does not work for White; for example, in the last line White would lose.
In the third diagram, remove the pawn at c5 and once again White wins.