The following is very slightly adapted from an article I submitted to the ICJ some time back. Unfortunately the ICJ seems to have fallen dormant, with the last issue having appeared a year ago this month. I’m still hoping we’ll see it return sometime soon, but as it’s unclear when, I think it’s a good time to post this here.
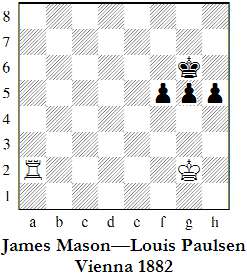
The game Mason-Paulsen, Vienna 1882, (see the ICU online archive of Irish games, http://www.icu.ie/games) reached the following picturesque and very unusual position, where White has just played 52. Rxa2:
What is the verdict with best play? Mason had no doubt it was a win, in his annotations to this game in his The Principles of Chess in Theory and Practice (London, 1902), pp. 272-76:
‘52. … g4 53. Ra8
If it were merely a question of stopping pawns with king, 53. Kg1 would be the move.
53. … h4 54. Rg8+ Kh5 55. Kf2 f4 56. Rf8 Kg5 57. Kg2 f3+ 58. Kf2 Kg6 59. Rh8 Kg5 60. Rh7
A coup de repos, better than 60. Ke3, which would give some chance of a draw. The White king gets in among the pawns, and it is all over.
60. … h3 61. Kg3 Kf5 62. Re7 Kg5 63. Rf7 Kg6 64. Rf4 Kh5 65. Rxg4 f2 66. Rf4 h2 67. Kxh2 1-0.
This ending, rook v. three united passed pawns, is of course very rare in practice.’
Mason identified Paulsen’s losing move as occurring a few moves earlier.
But these days such endings are within the range of tablebases, so we can check the exact status with perfect accuracy. Using the online Nalimov tablebases (http://k4it.de/index.php?topic=egtb&lang=en) several missed chances are revealed:
52. … g4?
One of only two losing moves: 52. … f4? is also bad but everything else draws. So the diagrammed position is drawn.
53. Ra8 h4 54. Rg8+?
54. Rf8! wins, the only move that does so.
54. … Kh5?
54. … Kf7! (only move) draws. Black is now lost and White gives no more chances to escape.
55. Kf2 f4 56. Rf8 Kg5 57. Kg2 f3+
Zugwang forces Black to break up the pawn front. 57. … h3+ 58. Kh2 and Black has to play … f3 or lose a pawn immediately.
58. Kf2 Kg6 59. Rh8 Kg5 60. Rh7
Mason didn’t like it but 60. Ke3 is also fine, and in fact it wins one move earlier than Rh7.
60. … h3 61. Kg3 Kf5 62. Re7 Kg5 63. Rf7 Kg6 64. Rf4 Kh5 65. Rxg4 f2 66. Rf4 h2 67. Kxh2 1-0.
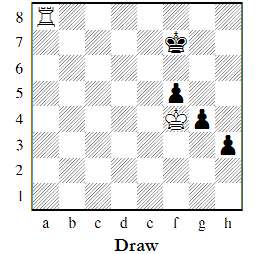
Speelman, noting that there is considerable theory on this ending, gives an extended discussion in Batsford Chess Endings (Speelman, Tisdall, Wade; Batsford 1993), pp. 219-224. Summarising, the first key position is shown below:
The key to the evaluation of the ending is the well-known fact that two connected pawns on the 6th rank can’t be stopped by a lone rook. In the position above, White can force the capture of the f-pawn by either king or rook. But a capture by the king can only be forced in a way that allows Black to reply … g3 winning (or perhaps forcing White to take a draw by perpetual), e.g. 1. Kxf5 g3 or 1. Ra3 Kf6 2. Rb3 Kg6 3. Rb6+ Kf7 4. Kxf5 g3 and draws, since White must take the perpetual. On the other hand a capture with the rook can only be forced with the White king on f4, when … h2 wins, e.g. 1. Rh8 Kg7! (only move) 2. Rh5 Kg6! (only move) 3. Rxf5? h2 or 3. Rg5+ Kh6 4. Rxf5? h2 and wins, or on e5, when … g3 wins. With the rook on a5-e5 and the White king on f4, Black shuffles his king between g6 and h6. So (regardless of who moves next) this position is drawn.
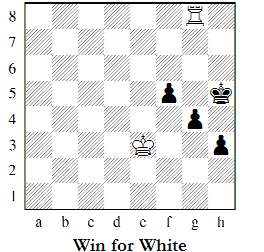
It’s not all plain sailing for Black, as there are some winning positions White can aim for.
Here the rook restrains an immediate … g3, but more importantly the Black king is cut off on the h-file. This prevents … h2 because of the skewer and also sets up mate threats, e.g., 1. … Kh4 2. Kf4 Kh5 3. Kxf5 and wins.
Note that this was exactly Paulsen’s final error: instead of 54. … Kh5?, allowing White to reach the model winning position, he should have played 54. … Kf7 followed by … h3(+), reaching the model drawn position.
After 1. … Kh6 above, it’s still a win for White but not a straightforward one. 2. Kf4? Kh7 draws, and it was thought there was nothing better until Kopaev (1958) found the winning approach: 2. Ke2!. After 2. … Kh7 3. Rg5 Kh6 4. Rxf5, the king is much better placed on e2 than f4, and White can stop the pawns. After 2. … Kh5 the main line runs 3. Kf2 f4 4. Rh8+ Kg5 5. Kg1! Kf5 6. Kh2 Ke4 7. Rh7 Kf3 8. Rg7 Ke2 9. Rxg4 f3 10. Re4+ Kf1 11. Kg3! f2 12. Rf4 and wins. So (regardless of whose turn it is to move) this is a win for White.
The International Chess Tournament Vienna 1882 was up to then the strongest tournament ever held: an 18-player double-round robin event including all, or almost all depending on opinion, of the world’s top ten. It ended in a tie for first between Steinitz and Winawer, after two playoff games failed to split the deadlock. James Mason, in one of the best results of his career, finished clear third on 23/34, ahead of Zukertort, Blackburne, Paulsen, Chigorin, Weiss, and Bird.
There’s an excellent account of the event in ChessBase Magazine 103 (2005), available online (http://www.chessbase.com/newsdetail.asp?newsid=2117).
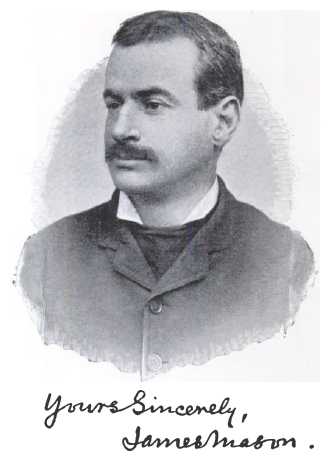
Mason’s origins are shrouded in mystery: his name was changed when he was a child and he never spoke publicly of his real name or place of birth. He was born in Ireland, it seems, though even that is not beyond dispute. Beyond that, although there are some very elaborate theories, nothing is known for certain.
His book, cited above, is now out of copyright and available on Google Books, so let’s take advantage by showing a picture from it:
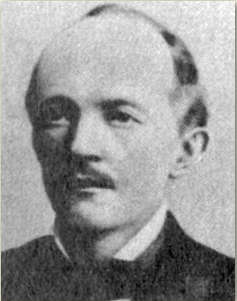
And while we’re at it, here’s a picture of Louis Paulsen, from the article at ChessBase.com mentioned above:
To be continued …

